Showing posts with label Bedroom. Show all posts

Sunday, November 18, 2012

Closet Case

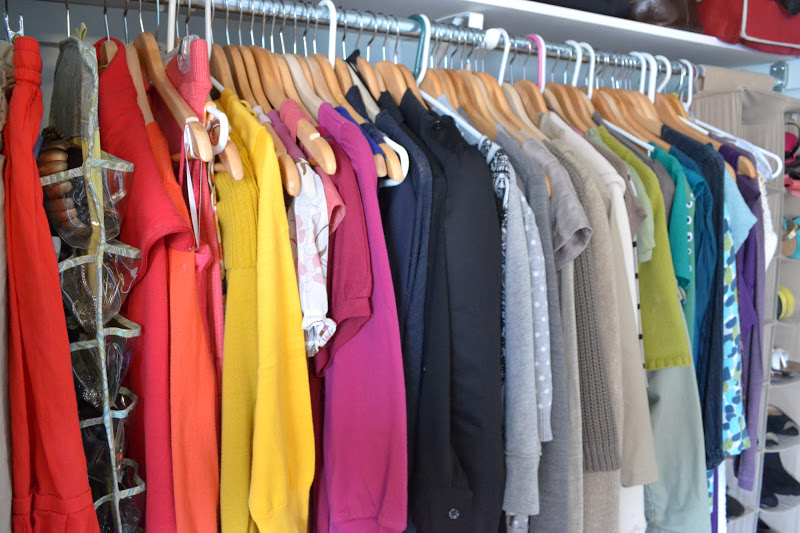
I LOVE organizing. If you know me, you know that. I can't get enough of things having a place and things being in their place. I especially love making organizing projects pretty. This is just what I did with my closet the other day. Randomly, and in about 15 minutes, I rearranged my closet to look like this:


Check out how I hold up my boots now:


 Thank you Pinterest for advising me on using pool noodles! Genius!


What a happy wardrobe! I honestly feel like I've revamped my entire wardrobe and it feels like new clothes in a way...all my looking at them a little differently. I don't find myself saying, "I have nothing to wear." I know we've all said it, but this simple update has helped me rethink the things I have.

Instead of all my pieces being with like pieces (jackets together, dresses together, etc.), now they live amongst the same tonal family! And it looks pretty!

Sunday, September 4, 2011

Bedroom Art Project

Friday I took a random jaunt around Collingwood while Michael worked days and found some great finds that let to three inexpensive art projects for the house. Just to keep the suspense I'll share just one today and the other two later.

At the "Dollar Villa" (nothing is actually a $1, but closeout buys really) I got three hideous 12 x 12 canvases, $6.99 each, and Amy Butler (what doesn't she design?!) scrapbook paper, 2 for $1 or cutouts - middle one - $1:


I used already owned supplies, including white and tan acrylic craft paint (to make off white), Mod Podge, and spray adhesive.


After 3 coats of the white paint to the edges, I realized I would have to take it up a notch to combat  the uneven color (see that bottom canvas with the darker lines). Why I didn't get the same canvas for all 3 I have no idea since I planned on covering them the whole time. Duh!

So instead I busted out what was left of already owned white spray paint and tackled them with that and it worked like a charm. Once that dried I used spray adhesive to glue on the scrapbook paper, then Mod Podged all 3, which actually didn't turn out as great as I hoped...


Here they are hung. Even from here you can even somewhat see the problem I had...


Though it gives them a shiny, even appearance, they were so wet that they turned out quite wavy. I tried to smooth out the bubbles, but it was near impossible. Oh well. That's what I get for $23 art. I'll keep it for now I suppose seeing as our walls are so bare.


Here's a wider shot of them in the bedroom, which I haven't shown you in a LONG time.


Here is our room from the beginning of the year:


Yeah, we've changed a few things you could say! Most everything has gotten a facelift. Here's a quick list of what's been done:

  • Removed mirror from dresser (sold at garage sale)
  • Painted both dresser and armoire 
  • Bought new bed frame with storage (we had our mattress and box spring on the floor in the above photo)
  • Replaced carpet with hardwood floor and new baseboards
  • Painted walls
  • Made and installed headboard
  • Bought lamp shades, sheepskin rugs, wall decals, small potted grass, 2 mirrors (one pictured above) that were primed and painted white, & a ceramic ram's head (yet to be hung) 
  • Sewed duvet cover 
  • Sewed new dog bed to match decor
We still have a couple things to do in here like buy a rug, floating nightstands that don't interfere with our under bed storage, and something tall for that far corner of dead space you see, but it's come a long way, don't you think?!

Friday, February 18, 2011

Sky High

So the bedroom has had a couple of face lifts (more like bed lifts - you'll see). I painted the accent wall, but I ended up changing my mind last minute (big surprise!) to a more grey-green color. I'm actually not too thrilled with it and might go back to the more blue-grey color. Michael wants me to live with a little bit and get the other color on the wall before I make an ultimate decision. Fine.

On a different bedroom note, we got our storage bed from IKEA. However, there was a little problem. When we bought it, it said there were 2 packages total to complete the bed. WRONG! Apparently there were three because we don't have the steel beam that runs parallel down the middle to support the box spring. We realized we would have also needed the wooden slats since our box spring needs support the opposite direction. Anywho....Michael took matters into his own hands and decided instead of driving back to IKEA (an hour+ drive) that he would fix himself.

He bought 2 x 4s and created a support system himself:


 The only problem is it lifts the bed at least 3 inches higher than we had anticipated the bed sitting. I practically need a step ladder to get into bed! Luckily my Michael's brother-in-law is coming up this way next week from near where IKEA is and will be bringing up the proper parts so we can lower the bed.


A bit ridiculous don't you think?!

Sunday, February 13, 2011

Hooray Duvet!


Finally! I've finished the duvet for our master bedroom! I bought the fabric sometime in November and didn't start it until yesterday. It took two nights, two spools of thread and 2 1/2 romantic comedies to complete!

I'm quite pleased with the results. I went out and bought a king duvet for our queen bed as our queen duvet still showed the sheets on the sides and simply didn't look clean. Luckily the fabric I had bought worked out perfectly for the larger size (woot woot!). It took a lot of precise measuring and lining up the pattern, not to mention getting the zipper lined up and sewn in properly.

All in all it was worth the effort I think. Oh, and I got shades for our lamps, finally! Unfortunately the stands we got from Bou Clair don't match up with most other shades so I was pretty much forced to go back and get them there. Not that I don't like them, but I usually don't like being tied down to one store. It's a nice basic shade, but I may add a ribbon to the top and bottom rims to help tie them into the room a bit more.


Yes, we still need an actual bed frame. Having the mattress on the floor isn't ideal after all. I would like one with storage underneath ideally. I'm thinking this one from Ikea:


brimnes-bed-frame-with-drawers-white__0107518_PE262152_S4.JPG.jpg

I'm not in love with the handles, but they could be replaced and at a lovely price tag of only $299 it's a top contender. Looking at other beds with storage, they can be upwards of $2K! Eeeks! I'll keep you posted on what we do in that department. Until then I'll be enamored with my new duvet. Sigh :)

Thursday, February 10, 2011

Color Compromise

As I begin to search for bedroom colors, Michael has gotten a bit uneasy. He's noticing a trend in my color choices: neutral. He wants to see color. Being color blind he has a bit of trouble pulling out the colors in the neutral shades I've come to love so much. So in my attempt to give a little in our brand new marriage I appease him as we order up samples at Home Depot. 


Again, using the duvet cover fabric as inspiration for the room, we bought two samples:
Behr's Lime Light (my pick one left) and CIL's Gentry Blue (Michael's pick on right). I had already made an attempt at choosing a color for the bedroom, but both colors were far too bold (see below). 

Here are all 4 on the wall (right two are the winners):


Perhaps you're wondering, why two colors? What's the plan? Well, though I'm not huge on accent walls, the dark color will go on the far wall where the head of the bed is. Though it's not an exact match, the dark grey/blue (Gentry Blue) that Michael picked will look fab behind the headboard I made and with the chromey nightstand lamps. The rest of the room will be Lime Light.
Wow, coulda made the bed don't ya think? Quite disheveled! 

Anyone else doing an accent wall for some drama? Any women compromising a bit for the interest of not over-femanizing or making everything only what they want?


Wednesday, February 2, 2011

Curtain Cure

So the sliding closet doors were quickly removed from our bedroom closets. Ugh, they drove me crazy and I was only here for 2 days at that point! I decided a softer look was necessary for the room, which meant curtains. I wanted them to coordinate with the duvet cover fabric I purchased a while back. On our long shopping day recently, Michael and I searched for fabric for said project at Fabricland (laugh, I did, really, Fabricland?!...silly Canada). Then I stumbled upon clearance curtains!

SCORE!! One solid rod panel curtain that just so happens to match the duvet fabric PERFECTLY! Best part?! They were $9.99. Woot woot!


So with the measurements I took we concluded we needed 3 panels (wrong!). I didn't take into account I wanted them to have plenty of wave when they hung, so I ended up going back to the store a few days later hoping they had a 4th, which they did. Shew. We also bought grommets so they would slide easily over the aluminum poles I bought from Home Depot.

So I laid them flat and measured evenly across the top for 6 grommets. There had to be an even number so when they were on the rod the ends would face the same direction when hung. Once measured I used the handy dandy template, which is a part of the packaging and marked each one, then cut them out. Pixel wanted to help as you can see. He moves quickly...hard to capture most of the time.


Once they are cut out it's simply a matter of snapping the grommets in place:


Easy peasy:


Next, I measured the length and marked it, then ironed the fabric down. Yes, I am ironing on the floor. We don't have an ironing board yet. Priorities, right?! 


From here I cut the majority of the remaining fabric and sewed the hem. I'm still learning, so it's not the best seam, but it's the backside so, eh, oh well. Then, my wonderful hubs installed the rods, which can't be taken down unless we unscrew the fixtures. Super for security, but then I realized I didn't iron them. Whoops, guess I'll have to try and steam them. Anyway, here is the end result:


Much better than before, don't you think?! And I can look into my entire closet without struggling with dated doors. Yay!