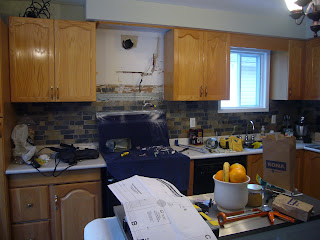
Since Michael's dad was here he thought he'd take advantage of his help and crank out the install in a few hour...ha, right! A project always ends up being more involved than you think doesn't it?! Well 7 1/2 hours and 3 trips to the hardware store later it was installed. It took several steps to get there. Before I show you the progress, here is a shot to show what it looked like pre-microwave:
The main issue was how low the microwave would sit if we were to install it as the cabinets currently were. We would have only had a 14" clearance between the bottom of the microwave and stove top. No good. So, first, the cabinet above the stove had to be removed since it would need to be cut down so the microwave could be raised.
Then Michael cut the grout of our backsplash just below where the microwave would sit. The he had to chisel the tiles off the drywall without damaging it. Then the microwave bracket was attached to the wall.
The top panel on the cabinets was removed and the whole cabinet was cut down, then the top replaced, using new dowels and wood glue, which got all over our carpet. Good thing we're getting hardwood and I couldn't care less about our dusty rose carpet!
The kitchen was a disaster. Dust everywhere!
Next, the cabinet was re-installed after the appropriate holes were cut that matched up with the vent hold on the wall and wires for the microwave.
Next, came the electrical part. See the original hood (seen in the first picture) was hard wired, so to make it safer, the guys decided there needed to be an outlet. Unfortunately, when it was installed, the breaker sparked and refused to turn back on. So, they were forced to take the cabinet back down and evaluate the situation. Ugh. So close to being done. They took it all apart and back together and eventually got it working again. Sorry for my lack of technical terminology. I just watched this DIY project :)
The easiest part was actually putting in the microwave. It slipped right on the bracket on the wall, then a couple of screws and viola:
Lots of sweeping of dust and wiping down everything later, we have an over-the-range microwave installed! Now we need to get the cabinet doors cut down to fit the newly sized cabinet frame and we'll be all set. Since I plan on painting the cabinets I'm not worried about the seams that this will create. If the snow would stop falling here perhaps I'll get to that project sooner rather than later!
Have you had a project that looked simple, but turned out to be WAY more involved?! Who hasn't, right?!


1 comment:
It looks so good, Steph! Good job, Mike and Papa Bear!! :)
Have you thought about leaving the doors off the cabinet and making it a little bookshelf??
Post a Comment